Photos from It's Written on the Wall.com
Showing posts with label Pumpkins. Show all posts
Showing posts with label Pumpkins. Show all posts
Saturday, November 10, 2012
Halloween/Fall Ideas
Here are a few great ideas for your next Halloween or Fall Harvest Party in the classroom (or at home). All of these ideas and more can be found at: It's Written on the Wall.
Sunday, October 2, 2011
No-Sew Fabric Pumpkin
Need a craft for your Fall-themed party?
Here is another example from www.trashtotreasuredecorating.com
Photo from: http://olivejuicestudio.com
You will need a roll of toilet paper for each child, a square of fabric (I use the pre-packaged quilting squares from JoAnn's), and a stick (about 1/2 to 1 inch thick and 4 inches long). I had the kids add pre-cut paper leaves, but you can add fabric leaves as pictured here. Here is the link to a great tutorial. The best thing is that it's not very messy, and it can be sent home the day of the party!!!Here is another example from www.trashtotreasuredecorating.com
Sunday, October 25, 2009
Fall Crafts
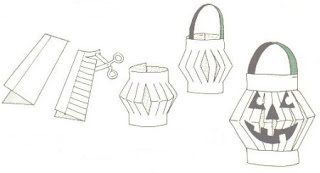
Pumpkin Lanterns
Materials needed:
12" x 18" orange construction paper
9" x 12" green construction paper
red, yellow, and black construction paper scraps
ruler
scissors
glue
stapler
Directions:
Teacher Prep:
1. Fold the orange paper in half to make a 6" x 18" rectangle.
2. Measure 2" in from the open edge and draw an 18" line across the paper.
3. Draw lines 1" apart between the fold of the paper and the 18" line.
4. Prep the handle: cut 1 1/2" x 12" strip of green construction paper,
For the kids:
1. Cut on the lines, starting at the fold. Do not cut all the way through.
2. Unfold the paper, bend it into a cylinder, and staple the side edges together.
3. Add the handle for the lantern, staple the strip in an arc to the top edge of the lantern.
4. Add the eyes, nose and mouth for the lantern, using scraps of construction paper
This idea comes from craftideas.info. I used this as one of the craft centers for our Fall Harvest Party. I pre-cut and pre-punched holes in the strips. Kids assembled them. I put out a variety of colors (orange, red, green, yellow) so that they could make apples or pumpkins. Some the kids put faces on them, and others mixed and matched the colors. The kids had fun with this fun and quick project.
Scarecrow Craft
Using Popsicle sticks, the kids can create a neat craft to hang on your door.
(Photo from: http://www.apples4theteacher.com/)
You will need:
7 craft sticks
8 yellow craft sticks
foam for kids to cut and add as decoration
Googley eyes
Pre-cut hats
Permanent Markers
Sunday, October 18, 2009
Subscribe to:
Posts (Atom)


